
Get Flipping: A Step-by-Step Guide to a Successful Flip Chip Assembly Process
Flip chip assembly process is an efficient way to mount integrated circuits and other electronic components onto a printed circuit board. With its advantages such as low cost, high reliability, and miniaturization, flip chip assembly has become increasingly popular in the electronics industry.
The basics of flip chip assembly
Flip chip assembly is a process for mounting electronic components on a printed circuit board (PCB). It’s a common and cost-effective method of assembling components, as it eliminates the need for using wires to connect the components. Instead, an adhesive is used to attach the components directly to the board.
This technique has been around since the 1950s, and with advancements in technology, it has become increasingly popular. The flip chip assembly process involves aligning and pressing a component into place on a substrate and then applying solder paste or other adhesive material to hold it there. The advantage of this method is that it requires less space and allows for greater miniaturization of components.
The flip chip assembly process can also be automated, which means that it can be done quickly and efficiently. This is particularly beneficial for large production runs, as it reduces the time it takes to assemble each component. In addition, the automated nature of the process helps ensure the accuracy and reliability of the final product.
With its precision and accuracy, flip chip assembly is often used for high-density boards where components must fit tightly together without any space between them. It is also used in applications such as automotive electronics, communication systems, medical electronics, and military electronics.
In summary, flip chip assembly is an efficient and reliable way to assemble components onto a PCB. It is a cost-effective option that can be automated for large production runs, making it ideal for use in a variety of industries.
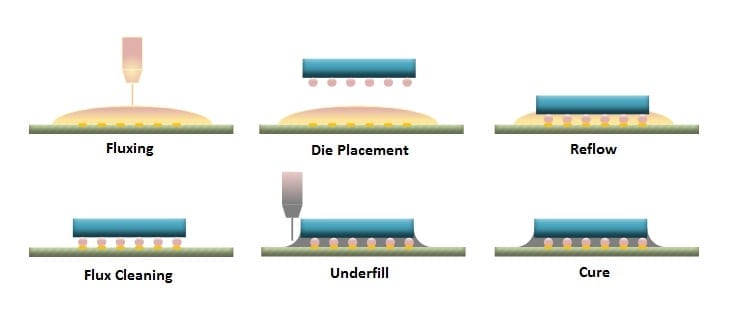
Key steps in the flip chip assembly process
1. Preparing the die: The first step in the flip chip assembly process is preparing the die. This involves testing the die for any defects or flaws before assembly begins. It also involves cleaning the die, and removing any impurities that could interfere with the assembly process.
2. Mounting the die on the substrate: Once the die has been prepared, it must be mounted onto a substrate. This can be done either by soldering or using an adhesive. During this process, careful attention must be paid to ensuring that the die is correctly positioned and securely attached to the substrate.
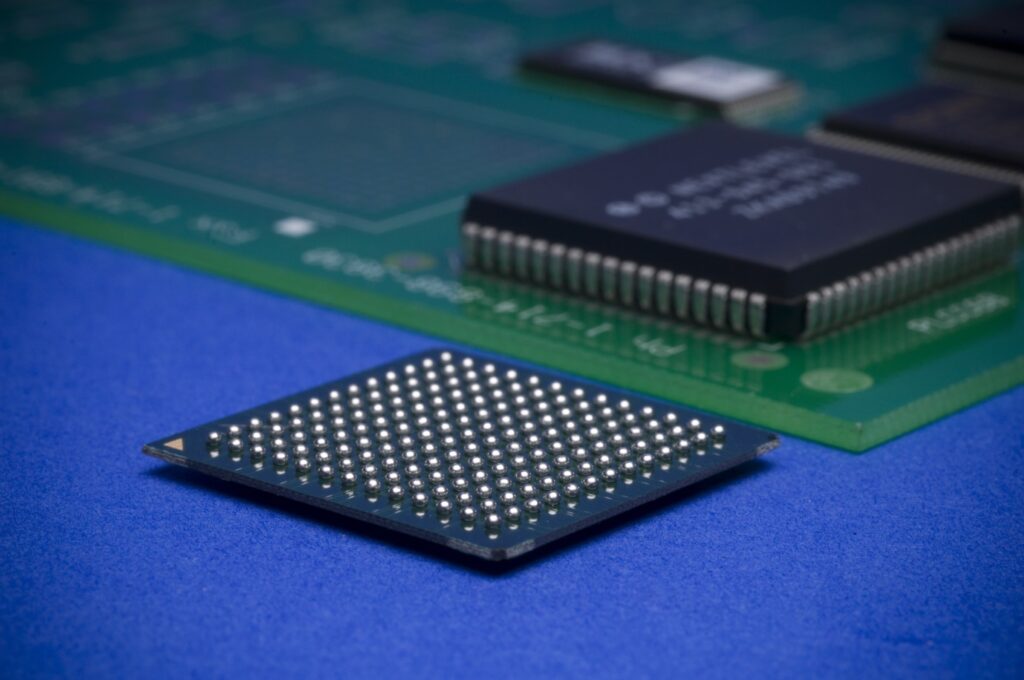
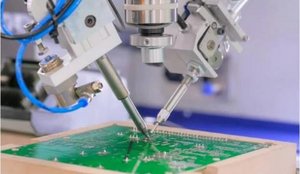
3. Applying solder balls: After the die is mounted onto the substrate, the next step is to apply solder balls to create the electrical connection between the die and substrate. The application of solder balls requires a specialized machine that can apply the precise amount of solder required for a successful connection.
4. Reflow soldering: Once all of the solder balls have been applied, the substrate and die must undergo reflow soldering. This is a critical step in ensuring that the electrical connections are secure and reliable. Reflow soldering involves heating up the substrate and die to a specific temperature, then allowing them to cool at a controlled rate.
5. Testing: After all of the above steps have been completed, it is important to test the flip-chip assembly to make sure that all of the electrical connections are secure and functioning properly. This can be done either with an automated testing system or manually by inspecting the connections under a microscope.
6. Packaging: Finally, after all of these steps have been completed, it is important to package the flip chip assembly for shipment or storage. Proper packaging ensures that the assembly is protected from environmental factors such as moisture or dust, which can cause electrical failure or corrosion.
Why a successful flip chip assembly process is critical
Flip chip assembly is a crucial part of any electronics manufacturing process. A successful flip chip assembly process is essential for ensuring that the finished product meets the highest quality standards. As such, it is critical to have a robust process in place for the flip chip assembly that can produce consistent and reliable results.
The flip chip assembly process is complex and requires a precise combination of materials and techniques in order to achieve a successful outcome. This includes selecting the right materials, using proper techniques, and following strict protocols during the process. As the flip chip assembly involves many intricate steps, there is a high degree of risk involved and any small mistake could lead to costly delays or even failure of the entire project. Thus, it is important to ensure that each step of the process is carefully planned and executed with the utmost attention to detail.
Furthermore, the flip chip assembly process requires specialized equipment, which can be expensive to purchase or rent. It is therefore important to ensure that the right equipment is selected for the job, as it will ultimately affect the end result. Additionally, proper safety procedures must be followed when handling materials and equipment during the flip chip assembly process. By ensuring that all safety protocols are adhered to, companies can reduce the chances of accidents occurring on the worksite.
Overall, a successful flip chip assembly process is critical for achieving quality products that meet customer expectations. By implementing the right processes, materials, and equipment, companies can ensure that their products are produced to a high standard and delivered in a timely manner.
How to Prepare for the Flip Chip Assembly
Preparing for the flip chip assembly process is critical to ensure a successful outcome. Here are a few important steps that should be taken prior to beginning the assembly process:
- Analyze the application and requirements: The first step in preparing for a flip chip assembly is to understand the specific application and its requirements. This includes analyzing the size, complexity, and number of components, as well as determining the desired level of precision and accuracy.
- Select the right package design: Once you have determined the application’s requirements, you can select an appropriate package design. This will determine the number of connections, size, and type of components that need to be used.
- Gather the right materials and equipment: After selecting the right package design, you need to source the appropriate materials and equipment for the assembly process. This includes the substrate material, adhesive, die, and other components.
- Inspect all materials: Before beginning the flip chip assembly process, it’s important to inspect all materials for any defects or damage that could affect performance. This includes looking for missing parts, discoloration, or other signs of degradation.
- Test the substrate: Once all materials are gathered, the substrate must be tested to ensure it’s compatible with the flip chip process. This includes testing for electrical properties, surface finishes, dimensional tolerances, and other factors.
Following these steps will help ensure a successful flip chip assembly process. It’s also important to take proper safety precautions during each step in order to minimize risk and prevent accidents.
The Different Steps in the Flip Chip Assembly Process
The flip chip assembly process is a crucial part of any successful flip chip design. To ensure a successful and reliable flip chip assembly process, there are several key steps that must be taken.
The first step is to select the right substrate. The substrate is the base material upon which the chip will be assembled. It is important to choose a substrate that is compatible with the chip design and can withstand the temperatures and pressures of the assembly process.
The next step is to prepare the substrate. This includes cleaning the substrate with a solvent or other cleaner, coating it with a special adhesive, and then curing it to ensure an optimal bond between the substrate and chip.
The third step is to place and solder the components on the substrate. This is done by placing each component onto the substrate, applying the correct amount of solder, and then heating it until the solder melts and bonds with the components and substrate.
Finally, after all of the components have been placed and soldered, the final step is to test and inspect the finished product. This includes testing to ensure that all connections are secure and that the chip operates as expected.
By following these key steps in the flip chip assembly process, you can ensure that your product meets your quality and performance expectations.
Choosing the Right Materials and Equipment for a Successful Flip Chip Assembly
When it comes to flip chip assembly, there are several materials and tools that you will need in order to ensure a successful process. First, it’s important to select the right chip size, shape, and material. This will ensure that the chip fits securely into the circuit board and makes good contact with the components.
Second, the type of solder and flux used will depend on the specific requirements of the application. Selecting the right solder and flux will help ensure reliable connections and reduce potential defects. The wrong type of solder or flux can result in poor adhesion, voids, or other failures.
Third, you will need to choose appropriate bonding materials for the flip chip assembly process. Bonding materials are essential for holding the chip in place during reflow. These materials can include adhesive film, epoxy paste, or liquid adhesive. Selecting the appropriate bonding material is critical for ensuring a successful flip chip assembly process.
Finally, you will need to select the right equipment for flip chip assembly. This includes an automated pick and place machine, reflow oven, laser marking machine, vision inspection system, and other tools. Depending on your specific requirements, some of these machines may be optional. Choosing the right machines for your application is essential for achieving high-quality and reliable flip chip assemblies.
By choosing the right materials and equipment for flip chip assembly, you can ensure that your assembly process is successful and reliable. By taking the time to research and select the appropriate components and machines, you can help ensure that your product meets all specifications and performs as expected.
EMSxchange Enables you to select a Printed Circuit Board, PCB Assembly, cable & wire harness assembly, and box-build suppliers meeting your Required Electronic Manufacturing Capability, capacity, and Certification Criteria from a global Electronic contact manufacturer base.
EMSxchange takes complete responsibility and ownership for your electronic manufacturing process and all its deliverables from contract manufacturing supplier selection to manufacturing to quality inspection to shipment and delivery to your door.
EMSxchange Electronic Manufacturing Partners Profile includes:
Argus Systems (AESPL) – PCB, PCBA, Cable Assembly, Box Build, Testing.
CerraSystems Inc – HDI PCB, Rigid Flex PCB, RF PCB