
How to Remove Epoxy Potting?
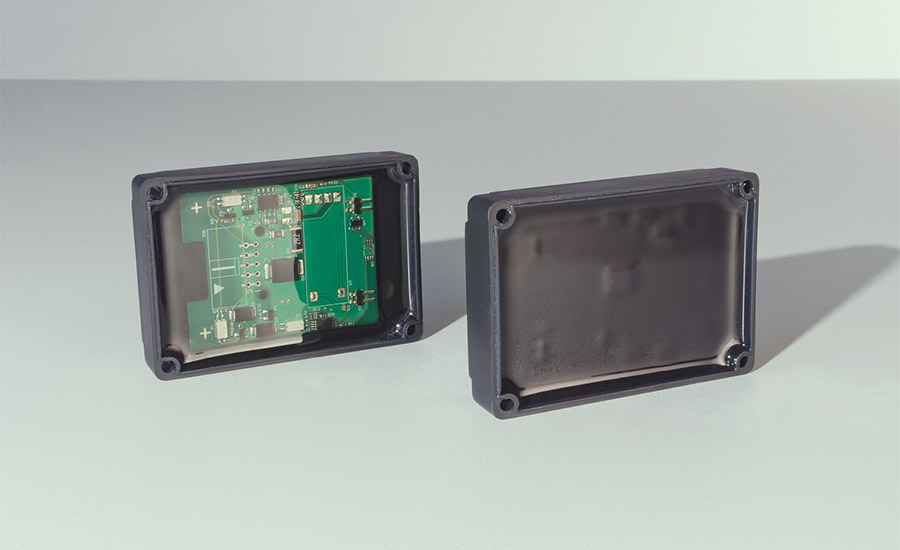
Epoxy potting is a commonly used method to encapsulate electronic components, providing protection against environmental factors such as moisture, dust, and vibration.
Reasons for Removing Epoxy Potting
There are several reasons why one might need to remove epoxy potting from electronic components or assemblies:
Repair or Replacement: If a component within the epoxy-potted assembly fails and needs to be repaired or replaced, it may be necessary to remove the epoxy potting to access the faulty component. This allows technicians to perform diagnostics, repair or replace the faulty part, and then re-pot the assembly.
Upgrading or Modifying Components: In some cases, it may be necessary to upgrade or modify electronic components within a potted assembly to improve performance or functionality. Removing the epoxy potting allows technicians to access and replace components as needed.
End-of-Life Disassembly: When electronic equipment reaches the end of its operational life or requires recycling, it may be necessary to disassemble potted assemblies to separate and recycle the individual components. Removing the epoxy potting facilitates the disassembly process and allows for the proper recycling of electronic components.
Testing and Inspection: During product development, testing, or quality control processes, it may be necessary to inspect or test individual components within a potted assembly. Removing the epoxy potting provides access to the components for testing, inspection, or analysis purposes.
Damage Assessment and Repair: In the event of physical damage to a potted assembly, such as cracks or leaks in the epoxy potting, it may be necessary to remove the potting to assess the extent of the damage and perform repairs as needed.
Reverse Engineering: In certain situations, such as when analyzing competitors’ products or understanding proprietary designs, researchers or engineers may need to remove epoxy potting to access and examine the internal components and circuitry.
Recycling or Reuse: When electronic equipment is retired or decommissioned, removing epoxy potting may be necessary to salvage and reuse valuable components or materials for other purposes.
Tools and Materials Required for Epoxy Potting Removal
To remove epoxy potting from electronic components or assemblies, you’ll need several tools and materials. The specific tools and materials required may vary depending on the size and complexity of the assembly, as well as the type of epoxy potting used. Here’s a general list of what you might need:
Tools:
Safety Equipment: Safety goggles, gloves, and a respirator mask to protect against fumes and dust.
Heat Source: Heat gun or hot air rework station for softening the epoxy resin.
Cutting Tools: Precision cutting tools such as utility knives, razor blades, or wire cutters for cutting through the epoxy potting material.
Mechanical Tools: Pliers, screwdrivers, or other mechanical tools for prying or removing components once the epoxy is softened.
Chemical Solvents (Optional): Solvents such as acetone or isopropyl alcohol may be used to soften or dissolve epoxy potting, though caution should be exercised as these can also damage other components.
Materials:
Epoxy Removal Agent (Optional): Commercially available epoxy removal agents or solvents, if chemical removal is preferred.
Absorbent Material: Paper towels, rags, or cotton swabs for wiping away softened epoxy or excess solvent.
Container for Waste: A suitable container for collecting and disposing of removed epoxy and solvent waste safely.
Cleaning Supplies: Isopropyl alcohol or other cleaning agents for removing residue after epoxy removal.
Protective Coverings (Optional): Tape or protective coverings for surrounding components or surfaces to prevent damage during the removal process.
Techniques for Epoxy Potting Removal
Removing epoxy potting from electronic components or assemblies can be a delicate process, requiring careful consideration of the specific circumstances and materials involved. Here are several techniques commonly used for epoxy potting removal:
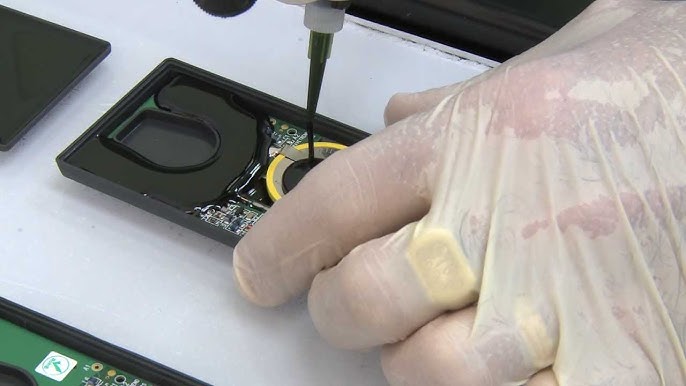
Heat Softening: Using a heat gun or hot air rework station, apply heat to the surface of the epoxy potting material. Heat softens the epoxy, making it easier to manipulate and remove. Be cautious not to overheat sensitive components or surrounding materials. Heat application should be gradual and controlled.
Mechanical Cutting: Once the epoxy is softened, carefully cut through the potting material using precision cutting tools such as utility knives, razor blades, or wire cutters. Work slowly and methodically, avoiding damage to the underlying components. Exercise caution to prevent injury and to avoid damaging the electronic components.
Chemical Solvents: Some epoxy removal agents or solvents can soften or dissolve epoxy potting material, facilitating its removal. Apply the solvent to the surface of the epoxy potting and allow it to penetrate for a period specified by the manufacturer. Be aware that chemical solvents may not be suitable for all types of epoxy or electronic components, and they should be used with caution to avoid damage.
Ultrasonic Cleaning: In some cases, ultrasonic cleaning can aid in the removal of epoxy potting material. Submerging the potted assembly in a solvent solution and subjecting it to ultrasonic vibrations can help break down and dislodge the epoxy. This method is particularly effective for smaller components or assemblies with intricate geometries.
Freezing: In certain situations, freezing the epoxy potting material can make it more brittle and easier to chip away. Place the potted assembly in a freezer or use a cooling spray to lower the temperature of the epoxy. Once chilled, carefully chip away at the epoxy using mechanical tools.
Abrasive Techniques: Abrasive methods, such as sanding or grinding, can be used to remove epoxy potting material, although they should be used with caution to avoid damaging the underlying components. Abrasive techniques are typically reserved for situations where other methods are ineffective or impractical.
Combination of Techniques: Depending on the specific circumstances, a combination of the above techniques may be necessary to effectively remove epoxy potting. For example, heat softening followed by mechanical cutting or chemical solvent application may be used sequentially to achieve the desired result.
Post-Removal Cleanup and Component Restoration
After removing epoxy potting from electronic components or assemblies, it’s important to perform thorough cleanup and, if necessary, restoration of the components. Here are some steps to follow for post-removal cleanup and component restoration:
Inspect Components: Before proceeding with cleanup, carefully inspect the electronic components for any damage that may have occurred during the epoxy removal process. Check for cracks, scratches, or other signs of damage that may affect functionality.
Remove Residual Epoxy: Use appropriate tools and methods to remove any residual epoxy potting material from the surfaces of the components. This may involve scraping, brushing, or wiping away leftover epoxy using solvents or abrasive materials if necessary. Be careful not to damage the components during this process.
Clean Components: Once the residual epoxy is removed, clean the components thoroughly to remove any remaining debris, solvent residue, or contaminants. Use isopropyl alcohol or other suitable cleaning agents along with lint-free cloths or cotton swabs to ensure the components are clean and free from any residues.
Inspect for Damage: After cleaning, inspect the components again to ensure they are free from any damage or contamination. Check for any signs of corrosion, oxidation, or other issues that may have occurred during the epoxy removal process. Address any damage or issues as needed before proceeding.
Restore Functionality: If any components were damaged or removed during the epoxy removal process, take steps to repair or replace them as necessary to restore functionality. This may involve soldering new components into place, repairing damaged traces or connections, or performing other repair work as needed.
Reassembly and Testing: Once the components are cleaned and restored, reassemble the electronic assembly as per the original configuration. Test the assembly to ensure that all components are functioning correctly and that the assembly operates as intended. Conduct thorough testing to verify functionality and reliability before putting the assembly back into service.
Documentation: Finally, document the epoxy removal process, cleanup procedures, and any repairs or modifications made to the components or assembly. Keep detailed records of the work performed for future reference and troubleshooting purposes.
By following these steps, you can ensure that electronic components or assemblies are properly cleaned, inspected, and restored after epoxy potting removal, helping to maintain functionality, reliability, and performance.
EMSxchange Enables you to select a Printed Circuit Board, PCB Assembly, cable & wire harness assembly, and box-build suppliers meeting your Required Electronic Manufacturing Capability, capacity, and Certification Criteria from a global Electronic contact manufacturer base.
EMSxchange takes complete responsibility and ownership for your electronic manufacturing process and all its deliverables from contract manufacturing supplier selection to manufacturing to quality inspection to shipment and delivery to your door.
EMSxchange Electronics Product Design and Electronic Manufacturing Services Partner Profile:
Argus Systems (AESPL) Electronics Manufacturing – PCB, PCBA, Cable Assembly, Box Build, Testing.
Argus Systems (AESPL) Product Engineering – Electronics system design Services & consulting
Contact sales@sysargus.com to discuss How Argus Systems can support for your Electronics Design Design and Electronics Manufacturing Services ( EMS) Requirements.
